-
FAQ (14)
- Dino-Lite system requirements?
- Measurements and calibration
- Filesize captured by Dino-Lite
- Can I use multiple Dino-Lite devices on a single computer?
- How to: Record a time-lapse
- Do Dino-Lite or Dino-Eye devices store user data?
- How much power does a Dino-Lite use?
- What kind of environment can a Dino-Lite operate in?
- What is the framerate of a Dino-Lite or Dino-Eye device?
- What is a Dino-Eye camera?
- How does magnification differ between traditional and digital microscopes?
- What do the numbers on the microscope dial represent?
- Why does my magnification / measurement sometimes fluctuate?
-
Troubleshooting Windows (15)
- DinoCapture software keeps crashing
- Why is my Dino-Lite missing or not recognized in Windows device Manager?
- What is Error Code 10 on Windows?
- What are Error Codes 19 and 39 on Windows?
- What is Error Code 28 on Windows?
- DinoCapture software window is black
- DinoCapture software opens but camera window is missing
- How do i use an older Dino-Lite with Windows 8, 10 or 11?
- What is Error code 43 on Windows?
- Issues after Windows update
- DinoCapture software screen is missing
- How do i transfer DinoCapture 2.0 files to another Windows PC?
- How do i reset DinoCapture back to default settings?
- Why do i see a "verified apps only" error message in Windows?
- Legacy models and Windows 11
-
Troubleshooting MacOS (8)
- Dino-Lite macOS compatiblity
- Why do i see "Error unidentified developer" on macOS?
- Can i use DinoCapture softwareon macOS?
- Are older Dino-Lite compatible with macOS 10.11 or newer?
- Common issues with DinoXcope software for macOS
- How do i transfer Dinoxcope files to another Mac?
- DinoXcope software does not open
- DinoXcope software screen is black
-
How-to (19)
- How do I use snap mode (edge detection) in DinoCapture
- How do I save location information using a GPS device in DinoCapture 2.0?
- How do I enable DinoCapture's contiuous measurement feature?
- How do I save custom camera settings?
- How do I set the default email program in DinoCapture?
- How to use EDOF (Extended Depth Of Field)
- How do I use custom shortcuts in DinoCapture?
- How to: Record a time-lapse
- How do I transfer DinoCapture 2.0 files to another Windows PC?
- How do I use the auto calibration feature in DinoCapture
- How to use Dino-Lite's DPQ featureto gather depth information
- How do I update DinoCapture?
- How to use eFLC (Enhanced FLC)
- How do I acces DinoCapture's advanced settings?
- How to connect to WF-10 or WF-20 to DinoCapture 2.0
- How do I transfer DinoXcope files to another Mac?
- How do I adjust the color of a Dino-Eye camera?
- How do I find my Dino-Lite model or serial number?
- How to read Dino-Lite model numbers
How do I use the auto calibration feature in DinoCapture?
Auto Calibration requires a Dino-Lite Edge Series microscope camera, CS-40 or CS-41 Auto Calibration slide, and DinoCapture 2.0 versions 1.5.25 or newer, click here to download the latest version.
Auto Calibration provides an easier way to calibrate a Dino-Lite Edge Series microscope for measurement. The DinoCapture 2.0 software identifies special QR codes on the CS-40 / CS-41 slide and performs the calibration automatically.
For older calibration slides (CS-30, MS5MM) or seeking manual calibration information: PDF guide | Video guide


QR codes are divided into 3 rows:
- Row A: magnifications of 120x and above
- Row B: magnifications of 40x – 220x
- Row C: magnifications of 20x – 50x
Tip: For more accurate results, it is recommended to create and save a calibration profile for each magnification range that measurements will be performed at. Calibration profiles are stored in the Calibration drop-down menu and a check mark will appear next to the selected profile.
Automatic calibration with the CS-40 / CS-41 slide
Instruction | Screenshot |
---|---|
Bring the CS-40 / CS-41 into focus with the Dino-Lite. Tips: Make sure the microscope is perpendicular to the calibration target. View two or more QR codes for the best results. Misaligned or heavily tilted slide while in view may result in calibration failure | ![]() |
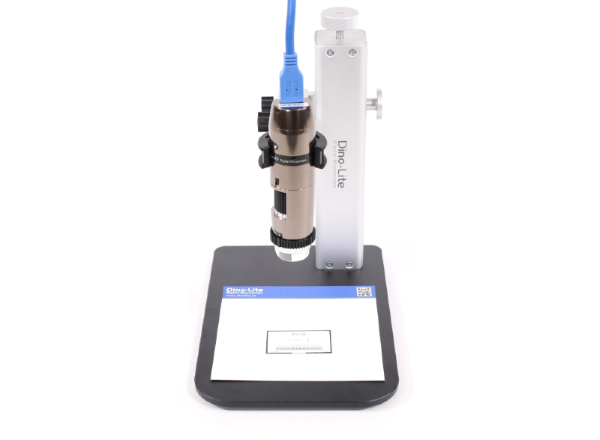
Click the Calibration tool menu item and select New Calibration Profile. Type in a name for this calibration profile and click Continue Calibration. | ![]() |
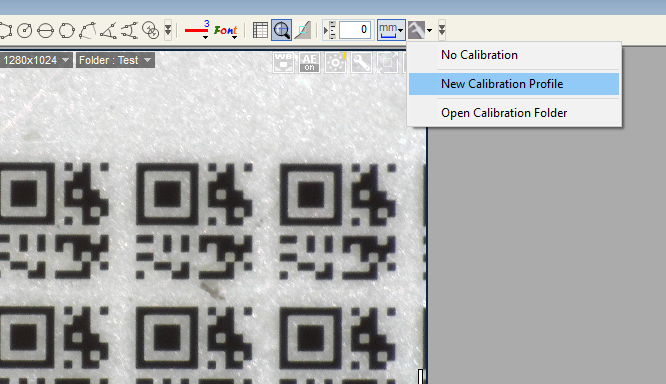
Press F8 or click on the Freeze button. | ![]() |
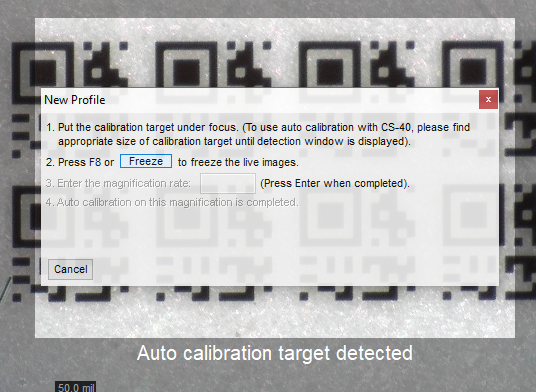
Input the Magnification as shown on the dial. Microscopes with AMR display the magnification automatically. Press Enter. | ![]() |
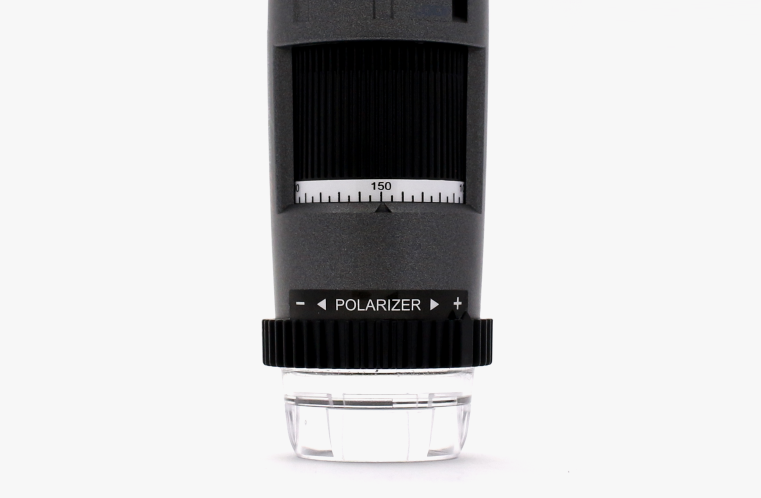
The software will automatically perform the calibration measurement and provide the adjusted magnification. Click Finish to complete the calibration. | ![]() |
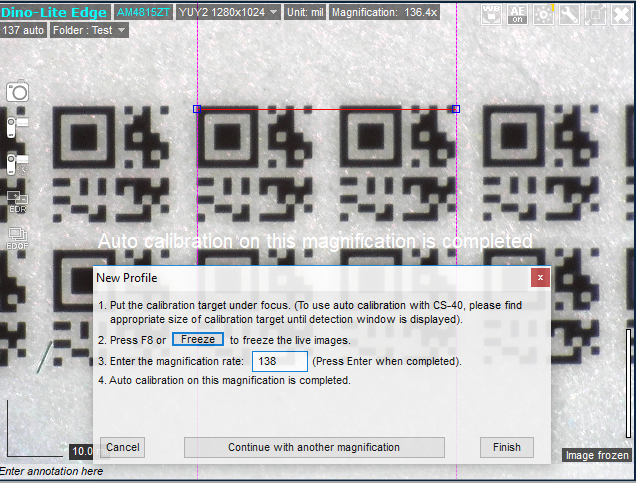
Verify your calibration by performing a test measurement with a known standard or the 10mm scale on the CS-40 / CS-41 slide | ![]() |
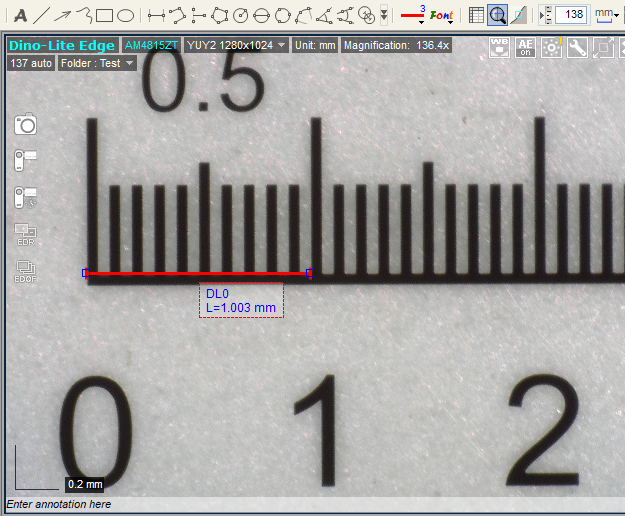
Tips: For best results, select a calibration profile close to the magnification you are using. If fixed magnification is required, simply calibrate at that magnification only for the most accurate results. Calibration can be disabled by selecting No Calibration in the drop-down menu. | ![]() |
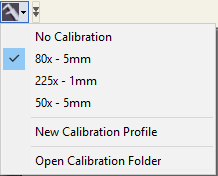